HANDS ON: Micro 3D Beta Test – Catch up, NEW Chameleon & UNRELEASED FLEX Filaments
Adam Milton-Barker | Oct 19, 2015 | 3D Printing and Scanning | 5049
Some of you will remember that in 2014 I backed the Micro 3D Printer project on KickStarter which received 11,855 backers and raised $3,401,36 towards building their company. As part of my backing I was also made part of the exclusive Beta Panel whose task it is to help M3D identify and fix bugs with the units before they became available to the public.
Just To Let You Know...
There are quite a few issues that are mentioned in the following catch up, before I go through them I would like to state now that the support of Michael and the Beta Team has been amazing in helping to get to the bottom of these issues, and although I have a couple issues left to solve, I am able to print decent quality prints even on low quality settings.
A Quick Catch Up...
You may remember in my last article for the Micro 3D Beta Panel that I had run into some teething problems with the unit during the first prints. I was able to resolve the PC crash issue mentioned in the last article by moving the printer to another, faster PC. Unfortunately over the next few months, whenever I had time to do some testing I did face several issues with the unit including one of the wires near to the fan snapping and getting caught in the fan regularly, issues with ABS clogging up around the nozzle, spaghetti style prints, prints only printing on one axis and in some cases no filament extruding at all.
During these issues I worked very closely with Michael and the M3D Beta Team who provided first class support throughout. After not being able to get to the bottom of the issues, Michael very kindly suggested that they would send a replacement printer out to me which arrived very quickly. Although the improvements with the latest software were very good, unfortunately again with this unit I faced issues which included the internal loader not working, the print head dragging across the print and the print head not moving up when changing filaments. Wanting to get me to stage where I was happy with the prints I was producing as much as I was, Michael again very kindly sent out a replacement unit and also offered to send me some of the brand new Chameleon filament and the unreleased FLEX filament, allowing me to be the first to review them online.
Now We Are Up To Speed.. Software Improvements...
The current software has improved a lot since I wrote my last review, there is a new enhanced graphics mode and layout, the option to now print without a raft (which is feel is a massive improvement), model on model support and wave bonding.
Support material adds additional structures around the model which will build up to then support the overhanging part.

Model on model support adds additional structures on top of the model below, which will build up to then support the overhanging part.

Wave bonding is useful for larger prints to prevent the first layer from warping/peeling. For the very first layer, anchor points are created approximately every 5mm to ensure the model sticks to the print surface.

With now being able to print without a raft, the whole process goes a lot quicker and also reduces the amount of wasted filament. The speed of prints has also improved dramatically, although I do feel that this is one area that the printer can still improve on, nevertheless I am happy that the speeds have improved greatly.
More Advanced & Larger Prints...
Throughout the time that I have been testing, more advanced STLs seem to fail constantly, successful prints have been things such as Pacman, pen holders, Bender from Futurama, Raspberry Pi B+ cases, keyrings and spool feeders, but more detailed projects and projects that may be classed as awkward due to the complexity of them have failed. One of my remaining final issues with the printer at this stage is that the actual unit is too small to do many of the larger projects I have tried such as larger RPi boxes, humanoid body parts for my robot and other projects that require quite a large printing area.
Setting Up For Print...
I proceeded with the steps to load the filament internally, unlike the attempt on the previous machine, this worked correctly first time and the printer was now setup with the brand new Chameleon filament ready for the first print which was a stand for my iPad3.
Note To All 3D Printers... Check Your Spools!
The initial stages of the first print went very smoothly, you could see the the Chameleon ink in action as it printed out in a glowing white color as opposed to the orange color it was heading into the printer as. Unfortunately, I and my PC fell asleep. The next day on waking I had found that the print had stopped half way through (although still enough for me to use the iPad 3 stand), and there was a type of black goo on the top of the object where it had stopped printing. Initially this was thought to be due to the PC falling asleep, as there was no error message in the software there was nothing to suggest what had happened, it was only when I was having issues getting the filament to extrude that I realized the filament was twisted on the spool and had been the cause of the failed print. This lead to one of my final remaining issues, on trying to remove the filament from the internal loader, it was almost impossible and a lot of force was required to remove the filament which led to the internal feeder breaking and no longer able to function, I will be working with the team to fix this remotely. Having said that since moving to using the external feeder, there have been no more incidents and I have successfully printed out many successful prints.
The NEW Chameleon Filaments...
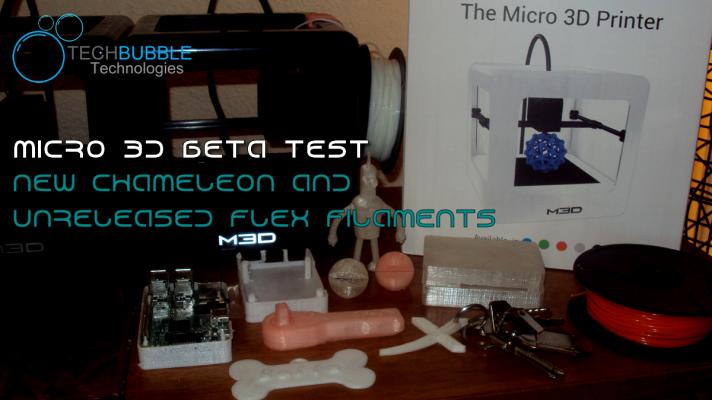
The Chameleon filament range is one of the latest filament releases from M3D, the filament is Thermochromic Color-Change PLA Filament and as the name suggests, changes color in different temperatures. Michael was very kind to send me through the Coral Orange Touch, you can see the original color of this filament in the main image for this article in the spool on the right hand side of the image. The wrench in the same image is my second print of the International Space Station wrench that I printed out in the first test run and this is what objects printed with Chameleon Coral Orange Touch look like when cool, to see what the wrench first looked like when coming off the printer and still warm check out the image below where you will also see the comparison to the initial print out of the wrench. The improvement in quality compared to the first print is unquestionable, the item is much smoother and it also printed a lot faster. You can also check out the video below to see my first Chameleon print which is a pen holder that now stands proudly on my desk.
The UNRELEASED FLEX Filament...
I was obviously very excited to get my hands on this filament and be the first to test it out. As the name suggest this filament is a flexible filament that allows you print flex objects. For my first few tests I printed out some keyrings and a dog tag for my pup which you can see in the images on this page. You can check out the second video below which will show you the last print I did with FLEX which is a Raspberry Pi B+ case. All of the prints were very smooth and considering I set everything to low quality, I am very impressed with the outcome. In the video for the Raspberry Pi FLEX print you will see some strings present but these took seconds to remove.
All in all I am very happy with both the Chameleon and the FLEX filament. In general with exception to my final three issues I am happy with the printer as a whole. The team has worked very hard to improve their product over the last year and has shown dedication and high level of support. Another plus side is I have been given permission to attempt to fix the additional two units so this will be another cool project for me when I get some more time. I look forward to working with the guys at M3D in the future and continuing to help improve their product.
FINAL VERDICT:
Support: 10/10
Printer: 8/10
Print Quality: 9/10
Print Speed: 8/10
For more info please check out the related link above and don't forget to check out the images and videos below.